Mgt 4322 - Home   Spring 2010   Email to Dr. Lyons     PatLyons Home
[ Calendar10:10 | PortWebsite | StuWebs  | Port1 | 2 | 3 | 4 | 5 | 6 | Showcase | Presentation ]
[ Ch 1 || 3 || 5 || 7 | 8 | 9 | 10 | 11 | 12 | 13 | 14 || AppDatabase | Ex1 || 3 | 4 | 5 | 6 | 7 ]
[ HW 1| 2 | 3 | 4 |
| Career1| 2 | 3 ] [
SJU | TCB | CareerCtr | StuInfo | CareerLinks ] [ SJU Closing ] [H1N1SelfAssessment]


  Database Exercise 6 - Create Personnel Report 

  1. Open the Microsoft Access database that you created in Database Exercise 2.

    1. To do this, open Microsoft Access, click File Menu, Open... .

    2. In the Open window, click on folders until you come to your port folder that you created for the Portfolio Exercise 1.

    3. Then, double click on AppMIS.mdb.  This is the database you created in Database Exercise 2.
       

  2. Create a Microsoft Access query for the Full Report of the Transaction File joined with the Personnel File.

    1. To do this, continue with your opened AppMIS.mdb database.

    2. For Access 2003, in the Database window, click Queries, and double click Create query by using wizard.
      For Access 2007, click Create tab on the ribbon, Query Wizard, then Simple Query Wizard.

    3. Follow the wizard by selecting your Transaction File in the dropdown Tables/Queries menu, selecting all the fields,
      selecting your Personnel File in the dropdown Tables/Queries menu, selecting all the fields, click Next,
      Detail (not Summary), click Next,
      key in your desired title (such as ClientFullbyAssociate), and Finish.
      The query appears in datasheet view.  It displays all the records in your transaction file along with all the personnel data fields.
      Next, click on the Design Icon (Triangle and Ruler).  The query appears in the Design View as shown in the screen image below.

      Notice how there is a line from the AssociateID field in the Client Table to the AssociateID field in the Associate Table.  This line represents the Join Properties of the two tables.  If you right-click on this line, a window will appear explaining the properties of the join.  The line appears because the AssociateID field name is identical in each table.

      If the name (and type) of your personnel ID is not identical in both tables, then go back to your Personnel file and change it.  If you still have problems, you may edit the relationship between the two files.  In Access 2007, click Database Tools, Relationships.  If the files do not appear in the Relationships window, drag and drop them to it from the Navigation Bar.  Then, drag and drop the personnel ID field from one table to the other.  The Join Properties line will appear.
      You must have a Join Line
      in order to correctly specify the query.


  3. Create a Microsoft Access report for the Full Report of the Transaction File joined with the Personnel File using the query you created in step 2 above.

    1. To do this, continue with your opened AppMIS.mdb database.

    2. For Access 2003, in the Database window, click Reports, and double click Create report by using wizard.
      For Access 2007, click the Create tab, then click Report Wizard in the Reports group.

    3. Follow the wizard by selecting the query you created in step 2 above from the dropdown Tables/Queries menu, selecting all the fields, click Next,
      How do you want to view your data? select by Associate (or whatever your personnel table is named), click Next,
      Do you want to add any grouping levels (no), click Next,
           (If, in Access 2003, you are not asked how to view your data,
                  then group data by your personnel table key field.)
      sort by your transaction table key field, click Next,
      select Outline 1 Layout (For Access 2007, Outline Layout works well),
      and Landscape Orientation, click Next,
      select Formal style, click Next, (For Access 2007, the None style works well),
      key in your desired title (ClientFullbyAssociate), and Finish.
      The report appears.  
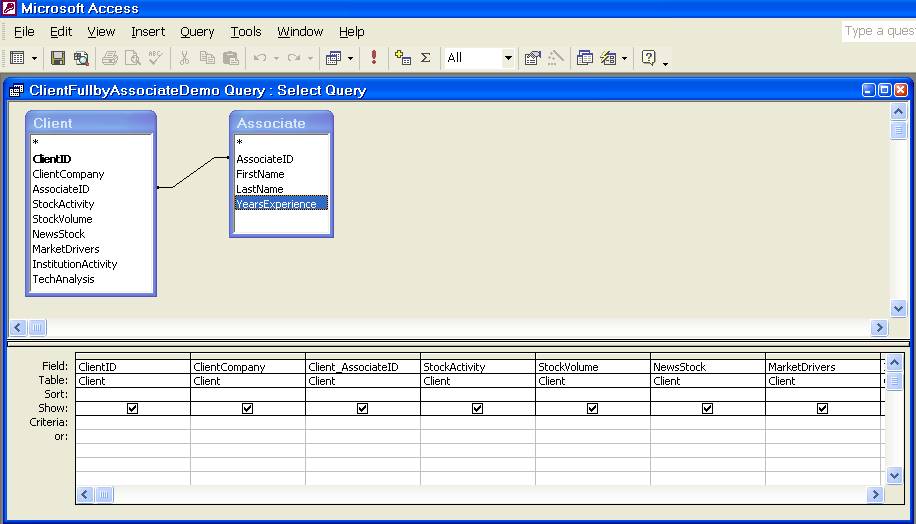
The partial screen image below shows how each associate's clients are presented in ClientID order.

    4. Edit the report title to start with "DB Ex 6".

    5. Compact (and Repair) your database.  See Database Exercise 2, Step 3.d.  This will make your AppMIS.mdb as small as possible.
       

  4. Use Microsoft Internet Explorer with ftp://stupub.stjohns.edu/ to drag and drop your modified copy of the entire port folder from your Mgt4322 folder to your stupub website.  This will copy your updated database, AppMIS.mdb.  Follow the instructions of Portfolio Exercise 1, step 5.

    1. If not all the files copy over to stupub, try dragging and dropping AppMIS.mdb by itself.  See Database Exercise 3, Step 3.
       

  5. Print your Full Report of the Transaction File joined with the Personnel File (should have landscape orientation).
     

  6. Requirements - see Homework Set IV

                                          (This page was last edited on April 01, 2010 .)